 RSS����
[���ߣ�����Ұ�� ����ϵ3SDNԭ����ArcGIS Engine+C#ʵ�������̡̳�֮һ��ת����ע���������ӣ� http://www.3sdn.net/gis2dev/ae/2009-07-13/448.html ]
��һ���У�����ʵ����ͼ�����Ա���������ܣ���һ������ҽ���ͼ���ע��ʵ�ַ�����
����ʵ�ֵ�����Ч�����£�
ͼ���עʵ�������������ӣ���������һ����ʾ����ֻ����AE����ʽ�⣬��עѡ�����ֶΣ�ּ����ש�������Ĺ��ܣ����Զ�����ʽ������ʽ���ɶ����Լ�ʵ�֡�
��Ҫ˼·��
����ͼ���ֶ� �C> �����ı���ʽ -> �����ı���ʽ
ʵ�ֹ��̣�
������ע���ô��� -> ����ͼ���ע��Command -> ����Command��ͼ���Ҽ��˵�
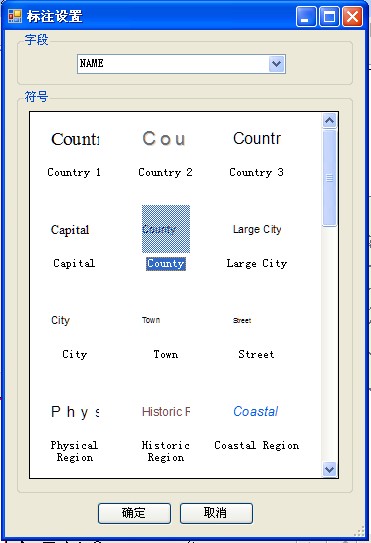
9.1������ע���ô���
��1������һ��Windows���壬����ΪLabelLayerFrm.cs�����ӿؼ����£�
|
�ؼ� |
Name���� |
Text���� |
���� |
|
SymbologyControl |
axSymbologyControl |
|
|
|
ComboBox |
cbbField |
|
|
|
Button |
btnOK |
ȷ�� |
DialogResult��ΪOK |
|
Button |
btnCancel |
ȡ�� |
DialogResult ��ΪCancel |
|
GroupBox |
groupBox1 |
�ֶ� |
|
|
GroupBox |
groupBox2 |
���� |
|
��2��ΪLabelLayerFrm������������Ա������
| public ILayer pLayer; private IStyleGalleryItem pStyleGalleryItem; |
��3������һ�����캯����
| public LabelLayerFrm(ILayer layer) { InitializeComponent(); pLayer = layer; } |
(4) ���ӳ�Ա����ReadRegistry�����ڴ�ע����ж�ȡArcGIS�İ�װ·����
| /// <summary> /// ��ȡע����е��ƶ�������·�� /// </summary> /// <param name="sKey"></param> /// <returns></returns> private string ReadRegistry(string sKey) { //Open the subkey for reading Microsoft.Win32.RegistryKey rk = Microsoft.Win32.Registry.LocalMachine.OpenSubKey(sKey, true); if (rk == null) return ""; // Get the data from a specified item in the key. return (string)rk.GetValue("InstallDir"); } |
��5������LabelLayerFrm�����Load�¼����Լ���ͼ���ֶε�����ģ�ͣ������ı���ʽ��SymbologyControl�ؼ���
| private void LabelLayerFrm_Load(object sender, EventArgs e) { //����ͼ���ֶ� ITable pTable = pLayer as ITable; IField pField = null; for (int i = 0; i < pTable.Fields.FieldCount; i++) { pField = pTable.Fields.get_Field(i); cbbField.Items.Add(pField.AliasName); } cbbField.SelectedIndex = 0; //���ArcGIS�İ�װ·�� string sInstall = ReadRegistry("SOFTWARE\\ESRI\\CoreRuntime"); //����ESRI.ServerStyle ��ʽ�ļ���SymbologyControl this.axSymbologyControl1.LoadStyleFile(sInstall + "\\Styles\\ESRI.ServerStyle"); this.axSymbologyControl1.GetStyleClass(esriSymbologyStyleClass.esriStyleClassTextSymbols).SelectItem(0); } |
��6������axSymbologyControl1�ؼ���OnItemSelected�¼���������ѡ������ʽ��
| private void axSymbologyControl1_OnItemSelected(object sender, ISymbologyControlEvents_OnItemSelectedEvent e) { pStyleGalleryItem = (IStyleGalleryItem)e.styleGalleryItem; } |
��7������ȷ����Ť��Click�¼���Ϊѡ��ͼ���е�ѡ�����ֶ���ѡ������ʽ��ע��
| private void btnOK_Click(object sender, EventArgs e) { IGeoFeatureLayer pGeoFeatureLayer = pLayer as IGeoFeatureLayer; pGeoFeatureLayer.AnnotationProperties.Clear();//����ִ�У���Ϊ������һ��Ĭ�ϵ� IBasicOverposterLayerProperties pBasic = new BasicOverposterLayerPropertiesClass(); ILabelEngineLayerProperties pLableEngine = new LabelEngineLayerPropertiesClass(); ITextSymbol pTextSymbol = new TextSymbolClass(); pTextSymbol = (ITextSymbol)pStyleGalleryItem.Item; //���������������ʽ����ɫ����������ԣ����Ĵ��� //pTextSymbol.Color //pTextSymbol.Font string pLable = "[" + (string)cbbField .SelectedItem + "]"; pLableEngine.Expression = pLable; pLableEngine.IsExpressionSimple = true; pBasic.NumLabelsOption = esriBasicNumLabelsOption.esriOneLabelPerShape; pLableEngine.BasicOverposterLayerProperties = pBasic; pLableEngine.Symbol = pTextSymbol; pGeoFeatureLayer.AnnotationProperties.Add(pLableEngine as IAnnotateLayerProperties); pGeoFeatureLayer.DisplayAnnotation = true; } |
���ˣ���ע���ô����Ѿ���ɣ���������ͨ�����������Dz�������������������ˡ�
9.2����ͼ���ע��Command
��1������һ�����࣬��ArcGIS��BaseCommandΪģ�壬����ΪLabelLayerCmd.cs��
ע�⣺���½�Base Commandģ��ʱ���ᵯ��һ���Ի���������ѡ��ģ�����ö�����ʱ����Ҫѡ��MapControl��PageLayoutControl����ѡ��ڶ�����ߵ����ڶ��
��2������LabelLayerCmd��ij�Ա������
| private ILayer pLayer = null; IMapControl3 pMap; |
��3����Ĭ�Ϲ��캯�����£�
| public LabelLayerCmd(ILayer lyr,IMapControl3 map) { // // TODO: Define values for the public properties // base.m_category = ""; //localizable text base.m_caption = "��ע"; //localizable text base.m_message = "��ע"; //localizable text base.m_toolTip = "��ע"; //localizable text base.m_name = "��ע"; //unique id, non-localizable (e.g. "MyCategory_MyCommand") pLayer = lyr; pMap = map; try { // // TODO: change bitmap name if necessary // string bitmapResourceName = GetType().Name + ".bmp"; base.m_bitmap = new Bitmap(GetType(), bitmapResourceName); } catch (Exception ex) { System.Diagnostics.Trace.WriteLine(ex.Message, "Invalid Bitmap"); } } |
��4����OnClick������
| /// <summary> /// Occurs when this command is clicked /// </summary> public override void OnClick() { // TODO: Add LabelLayerCmd.OnClick implementation LabelLayerFrm labelLyrFrm = new LabelLayerFrm(pLayer); labelLyrFrm.ShowDialog(); pMap.Refresh(esriViewDrawPhase.esriViewGraphics, null, null); } |
9.3����Command��ͼ���Ҽ��˵�
�ص�3sdnMap�������࣬�ҵ�axTOCControl1_OnMouseDown�¼���Ӧ�����������´���Ƭ�ϣ�
| //�����Ҽ��˵� if (item == esriTOCControlItem.esriTOCControlItemMap) m_menuMap.PopupMenu(e.x, e.y, m_tocControl.hWnd); if (item == esriTOCControlItem.esriTOCControlItemLayer) { m_menuLayer.AddItem(new OpenAttributeTable(layer), -1, 2, true , esriCommandStyles.esriCommandStyleTextOnly); //��̬����ͼ���ע��Command��ͼ���Ҽ��˵� m_menuLayer.AddItem(new LabelLayerCmd(layer, m_mapControl), -1, 3, false, esriCommandStyles.esriCommandStyleTextOnly); //����ͼ���Ҽ��˵� m_menuLayer.PopupMenu(e.x, e.y, m_tocControl.hWnd); //�Ƴ��˵��� m_menuLayer.Remove(3); m_menuLayer.Remove(2); } |
���ˣ��Ѿ����ͼ���ı���ע���������аɣ��Dz��ǿ�����ƪ��Ч���ˣ�
���ϴ�����Windows XP Sp3 + VS2005 + AE9.2/9.3�����±���ͨ����

